I love dresses. I have quite a few hanging in my closet. I find them so comfortable, and I also feel pretty when I wear one.
This one is already a favorite for me! This is the Whitney Dress by AK Patterns. When Athina sent her testing group an e-mail about this pattern, I was a little hesitant at first. I absolutely LOVE the style, but I've had such limited sewing time, and the dress looked a bit time consuming at first. I also was a little reluctant to test because this is a knit sewing pattern, and I only have regular interfacing. With the way things are right now, I knew I couldn't get out to get knit interfacing. So, I e-mailed Athina. She told me knit interfacing is suggested, but that my regular interfacing would probably be fine. So... I decided to test, and I'm REALLY glad I did.

Putting the Pattern Together:
Truthfully, this pattern took me a while to tape together and cut out. I taped it all together one afternoon. Then that night after the boys went to bed, I cut the pattern pieces out and all of my fabric out. I felt like I was never going to finish cutting. While cutting, I kept thinking, "I'm going to have to sew ALL these pieces. So many pieces." Honestly, looking back, it wasn't that many pieces, but I've sewn a lot of quick patterns recently, and this one did have a few more than a lot of what I've been working on. Some sews are like that though, right? You have a lot of pieces to cut out, a lot of pieces to put together, and you know you're going to have to dedicate a bit of time to the garment, but sometimes it is SO worth it.

Honestly, I've never ordered a printed AO pattern, but I think if I ever need to put it together again, I'd consider it with this one. Taping it wasn't awful- all of the pages were marked and easy to put together. Everything lined up nicely when I was putting it together. It was just a good many pages. Maybe I'm slow at taping though. 🤷
Sewing the Pattern:
This pattern was not complicated to sew. It really went together fairly quickly and easily. Based on the looks of the pattern, and my experience with sewing Athina's patterns, I knew that the dress would be put together well. I was excited to get started, but decided to pace myself and not do it all at once.
One day while the boys were busy, I decided to sew the scalloped front edge and get that part out of the way, so I'd be ready later.

Well... after sewing that part, flipping it right side out, and ironing it, I got REALLY excited. So much for pacing myself. 😅 That day, I found myself working on that dress every spare moment I had. I'd slip into my room and do about 5 minutes of work, come back out, deal with life, slip away again. Eventually, I had the bodice done. Then, I got so excited to make the skirt part (which was super quick). Then after the kiddos went to bed, I hemmed my dress.
So, this will be my warning... if you're anything like me, you'll get excited when you start seeing it come together and you won't be able to pace yourself over the course of several days. 🤣
The Fit of the Dress:
I love the fit of the dress. It's fitted at the bust and waist. It's a true wrap dress. The neckline is high enough on me that I don't feel like I need to wear anything underneath it.

Something I love about the pattern that will help you get a great fit are the cup sizes included! Athina has included different pieces with cup sizes A-DD to help you get a great fit, without the need of figuring out your own bust adjustments! So, if you're someone who generally needs a SBA or a FBA, this pattern is definitely worth looking into! This is the first AK pattern to have this feature.
The Finishes
The bodice is finished with a facing, and the skirt is hemmed. Everything goes together very nicely, and the inside looks very professional.

The pattern can be made as a top or a dress. The finishes and construction are the same, whatever you choose. Some of the people in the testing group made tops and they looked really dressy with pants. The dress could easily be dressed up for special occasions.
The Scalloped Edges:
As I mentioned this part was the part that made me hesitate from signing up to test. I thought they would be difficult to cut out, take a while to sew, and just be complicated. Plus... remember that I only had regular interfacing, not for knits?

Well for this part, I slightly deviated from the instructions to make it easier to put together. I traced my scallop pieces on my interfacing. Then I traced the scallop stitching lines to the interfacing. Next I ironed the interfacing pieces to the fabric. Then I was able to cut everything together very easily. In the future, I might just cut the scallop pieces as big rectangles and trim the scallops out after stitching, to make it easier and even less time consuming.
But this method was great. The scalloped edges came together much more quickly and easily than I was anticipating.
Would I Make Any Changes?
The only thing I would change is the inner ties. I sewed my dress from liverpool. I used the same fabric for everything. But, my liverpool ties on the inside are a tad bulky when wearing the dress. I think in the future, I would use a lighter weight fabric, or possibly ribbons, for the ties. I also have a store bought wrap dress that I was looking at the other day. It has a little tab with a button sewn on. The front inner bodice has a button hole to button up rather than tie. I love that dress, because I've never had the button come undone while wearing it. It is very secure, and I don't have any bulk. So I might try to do something like this next time!
Would I Make It Again or Recommend the Pattern?
Definitely! The dress is very well made, it goes together nicely, the instructions are incredible. I didn't have any trouble with any step. Yeah, it's a bit more time consuming than sewing a basic tee, but the finished product is much more impressive than a basic tee too! It's not a super quick sew, but it's really not very complicated either. I felt like maybe I spent more time cutting pattern pieces, fabric, and ironing on interfacing than I actually did sewing. 🤣

I really love the end result, and I'll definitely use the pattern again in the future! I look forward to being able to make more for dressing up and going somewhere (Whenever we're able to do that again)!
The Pattern Release:
The pattern is presently on sale for 10% off through this Sunday. You can see it here.


Also, come subscribe to my blog to receive notifications of new posts below!
This one is already a favorite for me! This is the Whitney Dress by AK Patterns. When Athina sent her testing group an e-mail about this pattern, I was a little hesitant at first. I absolutely LOVE the style, but I've had such limited sewing time, and the dress looked a bit time consuming at first. I also was a little reluctant to test because this is a knit sewing pattern, and I only have regular interfacing. With the way things are right now, I knew I couldn't get out to get knit interfacing. So, I e-mailed Athina. She told me knit interfacing is suggested, but that my regular interfacing would probably be fine. So... I decided to test, and I'm REALLY glad I did.

Putting the Pattern Together:
Truthfully, this pattern took me a while to tape together and cut out. I taped it all together one afternoon. Then that night after the boys went to bed, I cut the pattern pieces out and all of my fabric out. I felt like I was never going to finish cutting. While cutting, I kept thinking, "I'm going to have to sew ALL these pieces. So many pieces." Honestly, looking back, it wasn't that many pieces, but I've sewn a lot of quick patterns recently, and this one did have a few more than a lot of what I've been working on. Some sews are like that though, right? You have a lot of pieces to cut out, a lot of pieces to put together, and you know you're going to have to dedicate a bit of time to the garment, but sometimes it is SO worth it.

Honestly, I've never ordered a printed AO pattern, but I think if I ever need to put it together again, I'd consider it with this one. Taping it wasn't awful- all of the pages were marked and easy to put together. Everything lined up nicely when I was putting it together. It was just a good many pages. Maybe I'm slow at taping though. 🤷
Sewing the Pattern:
This pattern was not complicated to sew. It really went together fairly quickly and easily. Based on the looks of the pattern, and my experience with sewing Athina's patterns, I knew that the dress would be put together well. I was excited to get started, but decided to pace myself and not do it all at once.
One day while the boys were busy, I decided to sew the scalloped front edge and get that part out of the way, so I'd be ready later.

Well... after sewing that part, flipping it right side out, and ironing it, I got REALLY excited. So much for pacing myself. 😅 That day, I found myself working on that dress every spare moment I had. I'd slip into my room and do about 5 minutes of work, come back out, deal with life, slip away again. Eventually, I had the bodice done. Then, I got so excited to make the skirt part (which was super quick). Then after the kiddos went to bed, I hemmed my dress.
So, this will be my warning... if you're anything like me, you'll get excited when you start seeing it come together and you won't be able to pace yourself over the course of several days. 🤣
The Fit of the Dress:
I love the fit of the dress. It's fitted at the bust and waist. It's a true wrap dress. The neckline is high enough on me that I don't feel like I need to wear anything underneath it.

Something I love about the pattern that will help you get a great fit are the cup sizes included! Athina has included different pieces with cup sizes A-DD to help you get a great fit, without the need of figuring out your own bust adjustments! So, if you're someone who generally needs a SBA or a FBA, this pattern is definitely worth looking into! This is the first AK pattern to have this feature.
The Finishes
The bodice is finished with a facing, and the skirt is hemmed. Everything goes together very nicely, and the inside looks very professional.

The pattern can be made as a top or a dress. The finishes and construction are the same, whatever you choose. Some of the people in the testing group made tops and they looked really dressy with pants. The dress could easily be dressed up for special occasions.
The Scalloped Edges:
As I mentioned this part was the part that made me hesitate from signing up to test. I thought they would be difficult to cut out, take a while to sew, and just be complicated. Plus... remember that I only had regular interfacing, not for knits?

Well for this part, I slightly deviated from the instructions to make it easier to put together. I traced my scallop pieces on my interfacing. Then I traced the scallop stitching lines to the interfacing. Next I ironed the interfacing pieces to the fabric. Then I was able to cut everything together very easily. In the future, I might just cut the scallop pieces as big rectangles and trim the scallops out after stitching, to make it easier and even less time consuming.
But this method was great. The scalloped edges came together much more quickly and easily than I was anticipating.
Would I Make Any Changes?
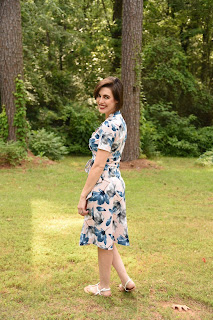
The only thing I would change is the inner ties. I sewed my dress from liverpool. I used the same fabric for everything. But, my liverpool ties on the inside are a tad bulky when wearing the dress. I think in the future, I would use a lighter weight fabric, or possibly ribbons, for the ties. I also have a store bought wrap dress that I was looking at the other day. It has a little tab with a button sewn on. The front inner bodice has a button hole to button up rather than tie. I love that dress, because I've never had the button come undone while wearing it. It is very secure, and I don't have any bulk. So I might try to do something like this next time!
 |
| in this photo, you can see the bulk of the inner ties a little. If I tie it more carefully, it is less noticeable, but I may make a little change in the future. |
Would I Make It Again or Recommend the Pattern?
Definitely! The dress is very well made, it goes together nicely, the instructions are incredible. I didn't have any trouble with any step. Yeah, it's a bit more time consuming than sewing a basic tee, but the finished product is much more impressive than a basic tee too! It's not a super quick sew, but it's really not very complicated either. I felt like maybe I spent more time cutting pattern pieces, fabric, and ironing on interfacing than I actually did sewing. 🤣

I really love the end result, and I'll definitely use the pattern again in the future! I look forward to being able to make more for dressing up and going somewhere (Whenever we're able to do that again)!
The Pattern Release:
The pattern is presently on sale for 10% off through this Sunday. You can see it here.


Thanks for Reading 💗
I hope you have enjoyed this post! I would love for you to come follow me on Facebook, Instagram, and Pinterest.Also, come subscribe to my blog to receive notifications of new posts below!
Comments
Post a Comment